
Hello and welcome to the Art & Design Department at Reigate College.
My name is Olivia Day and I’m the Course Leader for Art A Level. Art is a wonderful subject to study at A Level so I’m looking forward to meeting you and welcoming you to the department in person at the beginning of the academic year.
In preparation for this, and to keep you practising your drawing skills, I’d like you to complete a series of tasks and activities over the coming months. These activities are for you to do on your own at home, so you should have everything you need to complete them. I’m looking forward to seeing some of the work you produce when we start the course in September.
The tasks are organised in three distinct steps and should all be completed by Choices Day on 27 August 2025. This is to give you the best insight into what the courses will be like and/or help prepare you for them.
Please note, some Course Leaders (for example for Music) may release their tasks earlier, as they may form part of the College’s audition process. If this applies to you, you’ll be notified separately.
New Starters Course Tasks and Activities
| Release date | Suggested Completion Dates | |
| Explore your Subject | 1 June | 1 July |
| Get Going | 1 June | 1 August |
| Aim High | 1 June | 1 September |
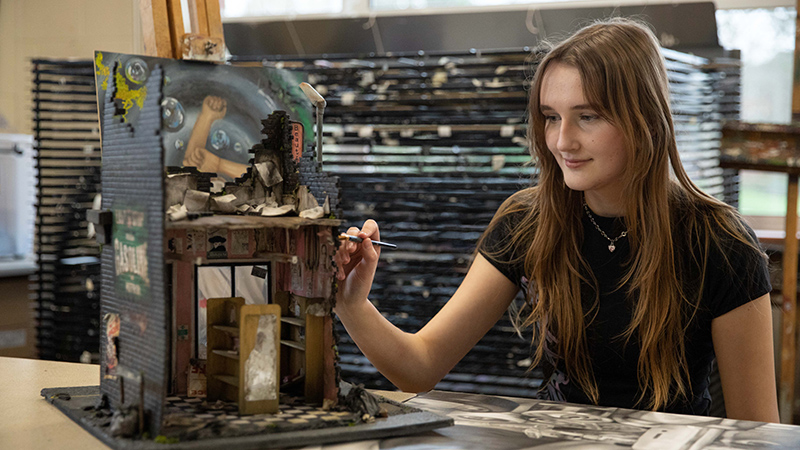
The start of your A Level Fine Art course may seem like a long way away but it’s really important to keep practising the skills you’ve developed through studying for your GCSE. One of the most essential skills in Art is being able to convey meaning visually; being able to represent your ideas in a visual way.
Understanding the Formal Elements in Fine Art is crucial to being an effective artist. The Formal Elements form the basis of the language of art, and we use them to communicate to the viewer. The elements are line, colour, form, shape, value, texture and space.
Task 1: Research the Formal Elements in Art and Design to gain an understanding of what they are – write down a simple definition for each element: line, colour, form, shape, value, texture and space.
Task 2: Observe the world around you and using your phone take photographs that emphasise the formal elements. Recording the world around you, is an important aspect of the course and you need to be creative in your approach to photography! Try going close up, try using different angles and edit your photographs afterwards to effectively communicate each Formal Element. For this task you will need to have 7 or 8 final photographs

Task 3: Using your photographs as a reference, create A5 studies of each element- try to over emphasise the element you are communicating through that study. For example if you are studying the ‘value’ photograph, ensure you have a good range of tone from dark to light and good contrast in your study. 2 or 3 of the studies should be tonal drawing, however you can be creative with the others and explore media and technology that you enjoy using. This could be collage, painting, mixed media, watercolour, pastels or digital artwork. For this task you will need to have 7 or 8 final A5 studies.

Here are some Golden Rules of Drawing
- Don’t smudge your tone; allow the marks you make to be directional and visible to help convey form and texture.
- Don’t draw lots of small objects spaced out and floating all over the page. Look at what is surrounding your subject and remember to include this to anchor your drawing. Look at your work from a distance to check you have sufficient contrast.
- Drawing can be recording evidence quickly in the form of accurate sketching or it can be long visual investigation; make sure you have a variety of styles.
- Plot the image lightly before you add detail, tone and texture. Be aware of the light source and record the darkest shadows first, looking for the true blacks and working back through the tonal range. Avoid heavy outlines.
- You could also try drawing just in tone or dots or with a rubber on a tonal background.
- Think about the space you will fill before you start. Lightly plot the outer area of your subject ensuring you can capture it on the page, for example, when drawing a person you want to ensure their head does not go off the page, at the same time you do not want the drawing to be so small you cannot capture detail.
- Consider the material most appropriate to capture the characteristics of your drawing.
- If the subject is moving, several overlapping sketches may be the best option.
- Check your drawing by measuring and looking at negative space.
- Try varying the type of mark you make to create texture and tone. For example, hard shiny surfaces are rendered with more solid marks and sharp contrast between tones. An orange’s pitted surface may be represented with dots; soft textures may have less defined marks. Tone can be created by placing the marks closer together and using darker medium such as softer pencil. Directional marks can also help show form e.g. curved hatching can help show a curved form.
- The lines and shapes in an image can convey different messages. Regimented, repeated lines suggest order and random lines chaos. Straight lines and shapes are more aggressive than curved. Repeated lines and forms can create a sense of movement. Lines and shapes can be used to create direction, which can help show form e.g. curved hatching on a tube shape. Direction can also create mood – top to bottom being more negative than upward.
- Importance can be given to elements of the image depending on the scale of them in relation to other elements or their location in fore, middle or background. Children often make heads larger in proportion to the body and eyes to head in their drawings as they perceive these to be the most important parts. Classical sculpture often exaggerated muscles and physique, making the head smaller to create a sense of power.
- The way elements of a picture are composed can create different moods and atmospheres. A very busy composition may look hectic and energetic. Imagine a landscape where a lot of sky is visible compared to one with a high horizon line. Perspective can create a sense of space and emptiness, or full intense images without a visible horizon. Different viewpoints can affect the way a subject is perceived.
All about the artists
One really important component of the A Level Art course is researching and analysing other artists’ work. It’s important to look at a broad range of work and think about the ideas and concepts behind the work. This will help you to develop your understanding of why artists work the way they do and how their life, culture and experiences impact the appearance and meaning of their work.
Here are links to London Galleries, find an exciting exhibition to go to:
Galleries
- National Gallery – www.nationalgallery.org.uk
- National Portrait Gallery – www.npg.org.uk
- The Barbican Art Gallery – www.barbican.org.uk
- The Hayward Gallery – www.hayward.org.uk
- Imperial War Museum – www.iwm.org.uk/
- Saatchi Gallery – www.saatchi-gallery.co.uk/
- Tate Britain – https://www.tate.org.uk/visit/tate-britain
- Tate Modern – https://www.tate.org.uk/visit/tate-modern
- Courtauld Institute – https://courtauld.ac.uk/
Magazines

You can also go on virtual tours of galleries like the Uffizi in Florence or the Musée d’Orsay in Paris without leaving home. Have a look at Google’s Art and Culture site for over 2,000 galleries and museums you can visit from home.
Online activities
Some galleries and museums have suggested activities and tasks you can try. Here are some of the best ones I’ve seen:
- The Museum of Modern Art in New York has a wealth of online courses you can take part in (the courses are free unless you want a certificate at the end). There are all sorts of things you can discover such as ‘What is Contemporary Art?’; ‘Seeing through Photographs’; ‘Fashion as Design’; ‘Postwar Abstract Painting’ www.moma.org/research-and-learning/classes

- Have a look at Firstsite Gallery’s artist-created activity packs, featuring contributions from UK artists including Antony Gormley, Sarah Lucas, Gillian Wearing, Idris Khan, Richard Wentworth, Cornelia Parker, Jeremy Deller, Vanley Burke, Mark Wallinger and more. ‘Art is where the home is’ will give you ideas about how to get creative at home. Anyone can have a go – there are no specialist materials required, plus it’s completely free to download. There are also behind the scenes guides to their exhibitions. https://firstsite.uk/art-is-where-the-home-is/
- The Pallant House Gallery in Chichester has some great at home activities including making a Pop Art inspired Collage. Some activities may be aimed at a slightly younger audience but you can adapt them to suit you. https://pallant.org.uk/learn-with-us/creative-activities-at-home/
- You could try and recreate your favourite piece of art work with things you find around your home. There are some clever examples here:
https://mymodernmet.com/recreate-art-history-challenge/

- The Victoria and Albert Museum (V&A) has a wealth of online activities. You can view the collection and take a peek at the latest exhibitions from Kimonos to Cars. You can also design a wig or add the V & A to your Minecraft world. https://www.vam.ac.uk/
- Google Art and Culture offers a multitude of activities from searching on themes or virtual visits to over 2,000 galleries to ideas for creating art on your phone.
Search Artists by Theme
There are other good websites you can use to search artwork by themes using Pinterest and My Modern Met and Art2Day: https://www.art2day.co.uk/artist-search.html

Watch TV
There are some excellent programmes you can watch in preparation for Art A Level:
- the BBC has lots of Arts documentaries on iPlayer: https://www.bbc.co.uk/iplayer/search?q=art

TASK: Over the next few weeks, please make the most of the above resources – go on a virtual or actual (!) museum tour, take an online course, or try out some of the activities. You should complete three or four different things, and above all enjoy finding out more about art and artists!
I look forward to hearing what you’ve discovered when we start the A Level course.
Making a Zine
Hopefully you’ve enjoyed the making and researching tasks you’ve been doing in preparation for the A Level Fine Art course. The last activity is to put together some of your ideas/work you have done in a zine.
Look at this Instagram account called ZINE SQUAD:
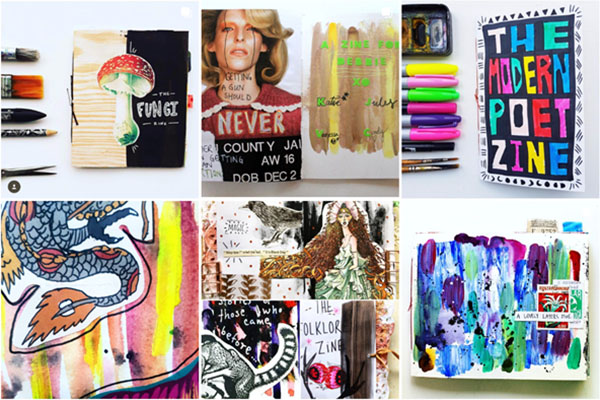

Making a zine is really simple, just follow the instructions below.
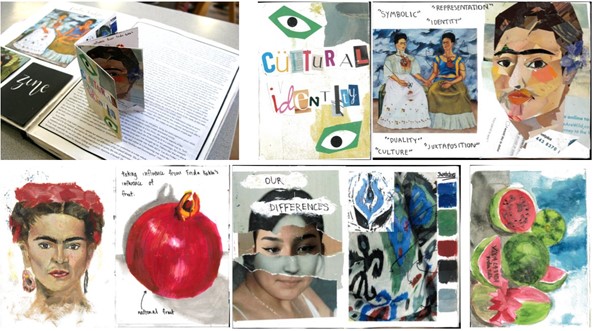
STEP 1: First of all, you need to choose a topic to research for the theme of the zine. Topics could include:
- nature
- lockdown
- portrait
- things I notice that no one else does…
- the built environment
- culture and identity
- anything you are interested in!
OR… you could put your FORMAL ELEMENTS photos and studies from Task 1 into a ZINE!!!
OR… you could make an Artist Research ZINE using your research from Task 2!!!
The theme needs to run throughout the zine.
STEP 2: If you decide you want to make an eight-page mini zine, all you need to start is one sheet of paper. If you have A3 or A2 paper then that would be great, otherwise you can just use A4, or maybe stick two sheets together.
Following the diagram below, fold the paper into eight rectangles and cut a horizontal slit down the centre of the page between the four innermost rectangles. Each little rectangle on one side of the paper will be one page.

There is a video showing how to fold this style of zine on YouTube: https://www.youtube.com/watch?v=ZjjylE3SPj8

If you want to make a stapled zine, you will need to use several sheets of paper folded in half (so that the left and right sides touch) to make a booklet. You can stitch or staple the centre.
STEP 3: Fill the pages of the zine with drawing, material explorations, photographs, information, paintings etc. all linked to your theme. It should have a sense of investigation. To get ideas, you could:
- visit some virtual galleries to find artworks that link to your theme
- copy sections of artworks to master techniques
- make notes about the ideas and concepts behind the artists
- try some of the drawing ideas from the earlier tasks and maybe add texture to some of the pages by working on more unusual materials like old fabric, newspaper with a coat of emulsion paint, torn paper etc.

Have fun creating your zine, and I look forwarding to seeing what you’ve produced when we start the course. Please bring in all the work you have done in preparation!

Course Leader – Art (Fine Art) A Level
